Displaying text with carriage returns

To display text that contains carriage returns and white space with the formatting in tact in display only columns in Interactive Reports, Tabular Forms, and Interactive Grids, enter the following in the Column Formatting – HTML Expression for the column:

<span style="white-space:pre-wrap; font-family:Segoe UI; font-size:12px;
 display:block;">#COLUMN_NAME#</span>

Note: for Interactive Grids, use &COLUMN_NAME. instead of #COLUMN_NAME#.  You will also need to set the column type to “HTML Expression”.

For IR and Tabular Forms, under Security, set Escape special characters to Yes.

APEX 5.1 Interactive Grid challenges

I love Interactive Grids, I hate Interactive Grids.  I love the enhanced functionality they bring to users by combing the things we love about the Interactive Reports with the editing capability of a tabular form as well as being able to have multiple IG’s on a single page.  Now that I have used them with regularity I am discovering some challenges with their use which is where the hate part comes in.  Please note, I am using version 5.1.4 of APEX.

Multiple Interactive Grids on a page

  • Performance – if you have multiple IG’s on a single page, be prepared for some performance issues when loading your page.  Changing the timing of when your data loads to be on demand will not likely help this either unless you have tuning issues with your queries. The issue stems from the initialization of the grid which is very JavaScript intensive, so each grid you add to your page will add to the issue. Slow performance appears to occur most noticeably using Microsoft browsers such as IE and even Edge and is least noticeable when using Chrome.  There was a bugfix released in 5.1.3 that brought some improvement but the issue still persists.  I have a page that has several IG’s on it and in Edge it takes 26 seconds to load whereas in Chrome it’s 11 seconds.  This issue has been raised many times and the APEX team is aware so hopefully in a future release we will see improvement here.  In the meantime I am instructing my users to use Chrome for the best experience.
  • Scroll Pagination – with multiple IG’s on a page, if you set the Pagination to “Scroll” only 40 records will display in the grid.  The record count displayed will be correct and there will be a large white space where the rest of the records should display.  You also cannot set the number of rows displayed in the Actions menu.  This issue occurs when using an IG on a modal page as well.

Read Only Interactive Grids

When conditionally setting an Interactive Grid to read only, the Primary Key (or ROWID) column which is normally hidden displays in the grid.  Fortunately there is a workaround to this issue, and I had a good chuckle when this solution was suggested to me.  Setting the Server-side Condition “Page/Region is NOT Read Only” on the APEX$ROW_ACTION column in the grid resolved this issue for me.

Wrapping of text/auto row height

One of the nice features of the Interactive Report is that large columns will automatically wrap and row heights will auto adjust to accommodate the wrapping text.  This functionality is not currently present in the Interactive Grid.  I have learned that the row selection and row action columns are actually in a separate grid than the data columns when the IG is rendered on the page which explains the absence of this functionality as it would require coordinating two separate grids.  Depending on your needs there are some workarounds to this issue, though none are perfect and I hope in a future release this can be addressed.

If you can live without the APEX$ROW_SELECTOR and APEX$ROW_ACTION columns, you can exclude them from your grid and add the following to your Inline CSS for the page:

#static_id .a-GV-table td, #static_id .a-GV-table th {
  overflow: visible;
  overflow-wrap: break-word;
  text-overflow: ellipsis;
  white-space: normal;
}

If you must keep your select and row actions columns, you can try the following.  The code to wrap the text must be entered for each column where needed and you must set the row height to a fixed value via css.  The downsides to this solution are all rows will be the same height even if the columns in that row do now wrap and if you do not make the row height tall enough to accommodate the maximum amount of wrapping possible you still won’t be able to see all the data in the column.  This is less of an issue for editable columns as you can view the full text placing the column into edit mode but for display only columns this is a problem.

In your Inline CSS for the page (adjust the number of pixels to meet your needs):

#static_id .a-GV-cell {
  height: 80px;
}

.wrap-cell {
  max-height: 64px;
  white-space: pre-line;
  overflow: hidden;
}

For each column in your IG that needs to wrap, enter the following under Advanced – JavaScript Code (replace &DESCRIPTION. with your column name):

function_config

I appreciate the efforts the developers at Oracle have done to bring us this great functionality despite the issues I have run into.  With any new technology, it is expected there will be a few hiccups when it is first launched and I look forward to future improvements being made to the Interactive Grid control.


Font Awesome icons in select lists

I needed to be able to display an icon along with text in a select list.  Fortunately the icons I needed were available in the Font Awesome library that comes with APEX and after much trial and error and research I was able to come up with a solution.

The key to this solution is locating the unicode for the icon you want to use and adding an escape function to your select list sql.  Below is my list of values query:

fa_select_list_query

A cheatsheet for the Font Awesome can be found here https://fontawesome.com/cheatsheet.  I found when playing around not all icons will work with this method so YMMV.

In addition you will need to set some Custom Attributes under the Advanced properties for your select list column:

icon_select_list_custom

I implemented this solution in version 5.1.4.  When I tried to create a demo app in 18.2 it unfortunately did not work.


Upgrading from 5.0 to 5.1: Lessons Learned Part I

I am in the process of upgrading a set of applications currently in APEX 5.0 to APEX 5.1.  Some of these applications were initially created in version 4.2 and have been through one upgrade already, while others were initially created in version 5.0.  The main goal of the initial pass was to get the applications working as is in the new version without making major changes to functionality or taking advantage of the newer features.

The upgrade from 5.0 to 5.1 was easier than than upgrade from 4.2 to 5.0 and required only minor adjustments.  The biggest issue was that a couple of applications initially developed in 4.2 used the CSS Bar Chart Plug-in which survived the 5.0 upgrade but is no longer usable in 5.2  These charts were easily re-written using the HTML 5 Bar Chart Plug-in.  Other issues encountered:

  • In order for the help text to display for a page item, the Label attribute must be entered for the page item.  Most text items had this attribute entered already, but was missing from most of the radio buttons in my applications.  To easily find any page items that had help text but were missing labels, I queried the APEX_050100.APEX_APPLICATION_PAGES_ITEMS view in the database.


  • Modal pages that used the Skillbuilders SaveBeforeExit Plug-in to detect changes had to be altered to prevent the change detected warning from appearing a second time after the modal is closed.  In my modal pages in 5.0, the plug-in did not actually prompt the users – I used it only to detect a change and wrote a dynamic action to prompt users if a change was detected when the modal page was closed.   In the dynamic action that closes the modal I had to add an additional javascript action after the user was prompted to disable the warning :
$(document).apex_save_before_exit('disableWarning');


  • Custom link columns referencing a URL in tabular forms had to be modified.  Previously to reference a value in the row it would be referenced using #ITEM_NAME# but after the conversion I had to change the reference to &ITEM_NAME. in order for the link to work.


In a future pass I will address converting the tabular forms, where appropriate, to the new interactive grid.  I did a test conversion and found that too many adjustments would need to be made with how my applications are written to be able to tackle it in the time frame I had.  My initial impression of the new interactive grid is good though, and I look forward to playing with it.  I will detail this conversion in a future blog post.


Displaying a modal dialog for page item help

I wanted to be able to display a modal dialog containing a small report as help for an item.  This is easy to implement and can really customize and enhance the help displayed for an item.

First create your modal dialog page you want to display as help.  Make sure if this modal will be called from another modal that you set Chained Dialog to No for the modal help page.

On the page you want to call the modal help from, create a hidden page item to store the url.  Set the Source Type to PL/SQL Expression and in the Source value or expression enter the following code, replacing ’38’ with the page number of your modal help page:

apex_util.prepare_url('f?p=&APP_ID.:38:&SESSION.::NO:38:', p_triggering_element => '$(''body'')')


Add the following code to the Function and Global Variable Declaration of the page you will be call the help from:

function showHelp() {
 eval($("#PX_YOUR_PAGE_ITEM").val());
}


Last, for the page item you want to display help for, add the following code in the Post Element Text.  This will display the help button icon that you normally see when help is entered for a page item and sets the onClick for the button to the showHelp function:

<button class="t-Button t-Button--noUI t-Button--helpButton js-itemHelp" title="Help" aria-label="Help" tabindex="-1" type="button" onclick="showHelp()"><span class="a-Icon icon-help" aria-hidden="true"></span></button>

You can access the demo application here (credentials guest/demo): Modal Dialog Help Demo.


Skillbuilders Super LOV disappearing on APEX 5 modal page

I use the Skillbuilders Super LOV liberally throughout my APEX applications.  I had one instance where the LOV exhibited strange behavior when on a modal page.

When entering a search string in the LOV and either pressing the search icon or pressing TAB, the LOV behaved as expected.  If I pressed ENTER instead, the LOV modal page appeared for a split second and then disappeared and the page would submit.  I could not tell if you the fact that it was on a modal page made a difference or not, although I have used the control on a modal page before.

My researched showed that several others had experienced this same issue but not a lot of solutions were found.  The only solution I did find pertained to having a hidden column as a map to item in the LOV, which was not the case for me.  You can view the discussion for this solution here:  https://community.oracle.com/thread/3785062

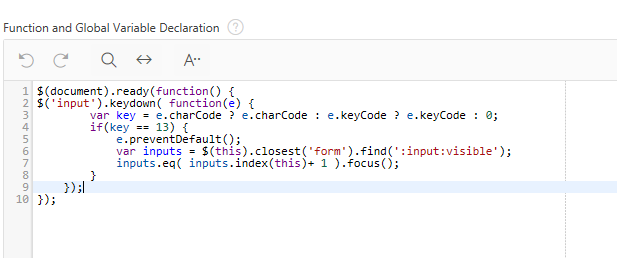
I tried deleting and rebuilding the LOV and placing it in a different position on the page with no luck.  The workaround I finally came up with was to code the ENTER key to perform as the TAB key on my modal page.  To do this, add the following code to your page:

keydown

Customized APEX 5 Calendar

I had a requirement to create a calendar to track change management data.  I was impressed with the calendar region that comes with APEX 5 and for the most part it met my needs.  I did need to add some additional features and customization to it though to meet the project requirements:

  • Customized color scheme to be in line with corporate standard colors
  • Display a spinner while calendar is loading because of the large quantity of data
  • When viewing data in the agenda list view, return user to the same location in the view after clicking to see detail information
  • Improve the navigation and display when moving between month/week/day views

Customized Color Scheme

Although the APEX calendar does provide some color customization, you are limited to a pallet of pre-defined colors.  In order to use colors outside of this list, you need to use .css.  This can be in-line .css defined for your page or can be in a .css file that you upload to your application.

To define .css entries for the month/day/week calendar views, your entry will look like this:

.fc .fc-event.apex-cal-created {
 background-color: #4F2170;
 border-color: #4F2170;
 color: #FFFFFF;
}

To define .css entries for the agenda view, your entry will look like this:

.fc .fc-agendaList-event.apex-cal-created {
 border-color: #4F2170;
}

After you have defined your .css entries, you will just need to include the name of the class (‘apex-cal-created’ in this example) in a column in your calendar query that you can map to the CSS Class region attribute for your calendar.

Display a Spinner

To display a spinner while the calendar renders, add the following to your page:

In the Function and Global Variable Declaration section of your page add:

myPopup = apex.widget.waitPopup();

Create a Before Refresh dynamic action on your calendar region that executes the following javascript:

myPopup = apex.widget.waitPopup();

Lastly, create an After Refresh dynamic action on your calendar region:

myPopup.remove();

Agenda View Navigation

To help users keep track of where they are at when viewing a long list of agenda view items, you can track the scroll position and return to the position when the page refreshes for example after returning from a detail view.

First create a page item to store the scroll position (P2_SCROLL_TO in this example.)  Create a page load computation to set the page item to 0.

Next create an on click dynamic action for the Jquery selector of .fc-agendaList-item.  This dynamic action will have two actions.  The first action is a set value that will set the value of P2_SCROLL_TO to the javascript expression of:

$(window).scrollTop();

The second is a PL/SQL “dummy” action to submit the value of P2_SCROLL_TO:

plsql

Lastly, create an After Refresh dynamic action on your calendar region (this can be combined with the same After Refresh dynamic action created to display the spinner).  This dynamic action will need two actions.  First execute the following javascript:

var y = $v('P2_SCROLL_TO');
window.scrollTo(0, y);

The second is a set value action to set the value of the P2_SCROLL_TO page item to 0 again.

Improve month/week/day view Navigation

The last piece of my customize was to improve the navigation between the month/week/day views.  For this I followed the steps on Roel Hartman’s Navigating through your APEX Calendar – the easy way post.

You can access the demo application here (credentials guest/demo): Customized Calendar Demo.  Data for this demo begins in November 2017.


Consuming Content Server webservices from an Oracle database

I recently had a requirement to consume Content Server webservices from an APEX application.  I opted to do this in the database and build a package to call the rest webservice API’s provided by Content Server.  The APEX_WEB_SERVICE package worked great for most of the requests that needed to be made (authenticating and receiving a token, getting node id’s and creating folders).

Keep in mind if the webservice you are calling uses SSL, you will need to setup an Oracle Wallet to store the certificates.  The root and any intermediate certificates need to be included.  In this example, since the package resides in the database the wallet needs to be created on the database servers rather than the application server.

You will need to set the following headers prior to calling APEX_WEB_SERVICE.make_rest_request:

 apex_web_service.g_request_headers(1).name := 'Content-Type';
 apex_web_service.g_request_headers(1).value := 'application/x-www-form-urlencoded;';

The first call you will need to make to Content Server is to authenticate and receive a token.  Use the APEX_JSON package to parse the response to get the token.  For this call you will need pass the username and password in the p_username and p_password parameters (this will not be required for subsequent calls since a ticket is passed in the header).


  l_clob := APEX_WEB_SERVICE.make_rest_request(
    p_url => '<your Content Server URL>/api/v1/auth',
    p_http_method => 'POST',
    p_wallet_path => <path to Oracle wallet>,
    p_wallet_pwd => <Oracle wallet password>,
    p_username => <Content Server username>,
    p_password => <Content Server password>,
    p_parm_name => APEX_UTIL.string_to_table('username:password'),
    p_parm_value => APEX_UTIL.string_to_table(<Content Server username>||':'||<Content Server password>)
 );

apex_json.parse(l_clob);

All subsequent calls to the API will need to include an additional header to pass the OTCS ticket obtained in the authentication API call:

 apex_web_service.g_request_headers(2).name := 'otcsticket';
 apex_web_service.g_request_headers(2).value := <your ticket>;

Depending on the API being called, most calls should follow a format similar to the example below and return a clob that can be parsed with apex_json.  This is an example of request to get the node_id of a folder or document:

 l_clob := APEX_WEB_SERVICE.make_rest_request(
   p_url => '<your Content Server URL>/api/v1/nodes/'||<parent node id>||'/nodes',
   p_http_method => 'GET',
   p_wallet_path => <path to Oracle wallet>,
   p_wallet_pwd => <Oracle wallet password>,
   p_parm_name => APEX_UTIL.string_to_table('where_name'),
   p_parm_value => APEX_UTIL.string_to_table(<node name>)
 );

apex_json.parse(l_clob);

However, I could not get APEX_WEB_SERVICE to work when uploading a document as this required a multipart/form-data request to be made.  Nick Buytaert at APEXPLAINED has a great solution for handling multipart/form-data requests that helped me solved my dilemma:  UTL_HTTP and a multipart/form-data request body — APEXPLAINED

One thing to note is that even though the request body variable is defined as a clob, Oracle will treat it as a varchar2 if you do string concatenations.  If you will be passing data greater than 32k, you will need to use dbms_lob to build up your clob.  In my particular situation, I had to break the request body up into three sections and write them to the request separately because the actual file payload needed to be sent as blob:

 while l_offset < l_request_body_length_pre loop
   dbms_lob.read(l_request_body_pre_file, l_amount, l_offset, l_buffer);
   utl_http.write_text(l_http_request, l_buffer);
   l_offset := l_offset + l_amount;
 end loop;
 
 l_offset := 1;
 l_buffer := null;
 
 while l_offset < l_request_body_length_blob loop
   dbms_lob.read(p_file_blob, l_amount, l_offset, l_buffer);
   utl_http.write_raw(l_http_request, l_buffer);
   l_offset := l_offset + l_amount;
 end loop;
 
 l_offset := 1;
 l_buffer := null;
 
 while l_offset < l_request_body_length_post loop
   dbms_lob.read(l_request_body_post_file, l_amount, l_offset, l_buffer);
   utl_http.write_text(l_http_request, l_buffer);
   l_offset := l_offset + l_amount;
 end loop;

Colorful Select Lists

To display color in the select list and retain the color after selection requires 2 steps.  This approach works best if you have a static LOV.  In my case the LOV has 3 choices, Low, Medium and High and the Medium and High choices fonts are colored.  You could use this method to change the background color as well.

To display color in the select list you’ll need to add the following code to the Post Element Text of your select list:

document.getElementById("P9_PRIORITY")[0].style.color = "black"; 
document.getElementById("P9_PRIORITY")[1].style.color = "#E86D1F"; 
document.getElementById("P9_PRIORITY")[2].style.color = "red"; 

My select list is ordered so that ‘Low’ is first.

To retain the color after a selection is made, create a dynamic action on the change of your select list that executes the following javascript code:

if ($v("P9_PRIORITY") == 'HIGH'){ 
 $("#P9_PRIORITY").css({"color":"red"}); 
} else if ($v("P9_PRIORITY") == 'MED'){
 $("#P9_PRIORITY").css({"color":"#E86D1F"}); 
 }
 else {$("#P9_PRIORITY").css({"color":"black"}); 
 }

This method is a different than what is used to color the list.  In this case I do need to specify what color I want for each value in the select list.  If you don’t specify a color for each value, when a selection is made it will remain the color of the previously selected value.

Please note, if using Internet Explorer, the color will not change after selection until you navigate away from the item.

You can access the demo application here (credentials guest/demo): Colorful Select Lists Demo


Cascading Select Lists and Super LOV’s and Automatic Selection

A request was made for a pair of cascading LOV’s to automatically select the value in the 2nd LOV if there was only one choice in the list.  This was fairly straightforward with a pair of select lists.  In the Default section for the 2nd LOV, I set the type to PL/SQL Function Body and wrote a function that selects the count of the records that should be in the second LOV.  If the count is 1 then select and return the id of the value to set, otherwise return null.

declare
  v_count number := 0;
  v_temp_id number := null;
begin
  if :P1_PARENT is not null then
    select count(*)
    into v_count
    from my_table
    where parent_id = :P1_PARENT;

    if v_count = 1 then
      select child_id
      into v_temp_id
      from my_table
      where parent_id = :P1_PARENT;
    end if;
  end if;

  return v_temp_id;
end;


To do this with the Skillbuilders Super LOV’s some extra steps are required. First, I created a hidden page item that would store my temporary ID (P1_ID_TEMP).  Then I created a dynamic action on the change of the parent LOV.  The first action of this dynamic action is a Set Value that uses the same PL/SQL Function Body as above to set the value of P1_ID_TEMP.

The second action of the dynamic action is to execute the following javascript code to set the value of the Super LOV:

$('#P1_CHILD').apex_super_lov('setValuesByReturn', $v('P1_ID_TEMP'));